WordPress’ built-in oEmbed features allow you to embed single events by simply pasting an event’s permalink into post or page content; you can learn more about this functionality here.
While that feature is useful, it doesn’t let you customize what event details to display, or in what order to display them. Furthermore, the oEmbed features only work within post or page content—what if you want to display a single event somewhere outside of that type of content, like in a sidebar, footer, or custom template?
The [tribe_event_inline] shortcode provides this extra functionality and more—it allows for the embedding of single events anywhere shortcodes can be parsed on your site, and with much more control than the oEmbed method.
The Basics
To use the [tribe_event_inline] shortcode, you need The Events Calendar and Events Calendar Pro on your site, with both plugins at version 4.4 or higher.
Once you’re ready to use the shortcode, there are two main things to keep in mind:
- You must always supply an event’s ID via the id shortcode attribute.
- You must always use at least one of the shortcode’s variables to generate content. (More on this below.)
Something like this, for example, is the absolute minimum amount of information you could supply for an event to render:
[tribe_event_inline id="167"]
{title}
[/tribe_event_inline]
If you were to write just this, meanwhile, no event content will be generated:
[tribe_event_inline id="167"]
Finding an Event’s ID
An event ID is required for the [tribe_event_inline] shortcode to work—but how do you find an event’s ID, exactly? The process is, fortunately, quite simple.
First head to the wp-admin edit screen of an event you want to embed. If you look in the URL bar of your web browser, you should see a URL that looks like this:
http://example.com/wp-admin/post.php?post=167&action=edit
Do you notice the part that says post=167? This indicates that 167 is the ID for that specific event. The following screenshot demonstrates this well.
 An event’s ID seen in the URL for its wp-admin edit screen.
Using Shortcode Variables
With the [tribe_event_inline] shortcode, you decide what event data shows, and where. Let’s take the following shortcode, for example:
[tribe_event_inline id="167"]
{title:linked}
[/tribe_event_inline]
☝ This shortcode selects the event whose ID is 167 and displays its title. The addition of :linked to title will make that title be a link that links to the permalink of the event.
Here is the output of the above shortcode:

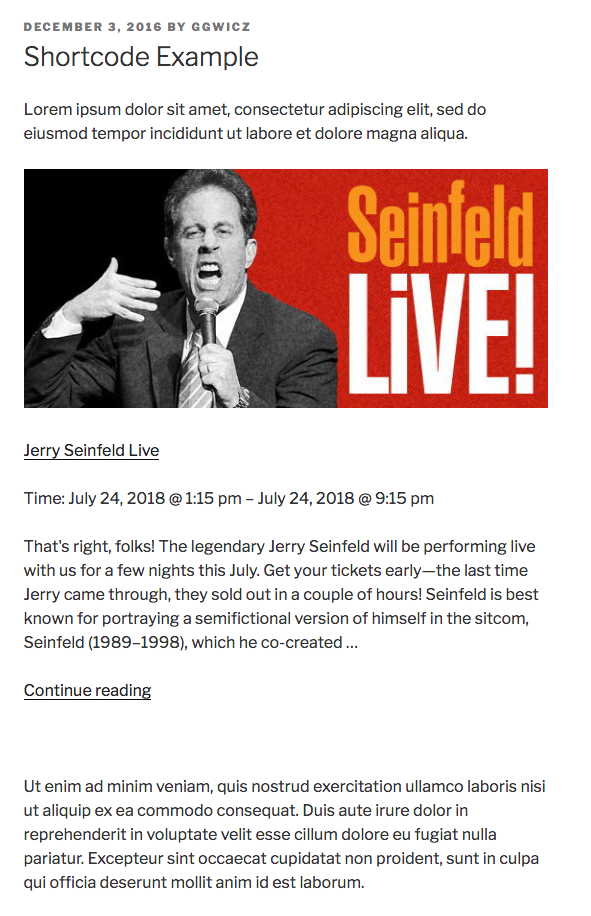
Let’s say you wanted to add the event’s thumbnail image, too—and other details, likes its start date/time, end date/time, and an excerpt of the event’s description. You could do all of that with a shortcode that looked like this:
[tribe_event_inline id="167"]

{thumbnail}

{title:linked}

Time: {start_date} @ {start_time} – {end_date} @ {end_time}

{excerpt}

[/tribe_event_inline]
☝ Here is the output of this shortcode:

All Shortcode Variables
A few variables were demonstrated above. What follows is a full list of all of the variables you can use in your [tribe_event_inline] shortcodes.
Events
Field | Variable | Notes |
|---|---|---|
Event Permalink | {url}{/url} | Example: {url}This text between the tags will be a link to the event.{/url} |
Event Title | {title} | |
Event Title (Linked) | {title:linked} | Displays the event title as a link to the event. |
Event Content | {content} | Displays the content of the event through the the_content filter. |
Event Content (Unfiltered) | {content:unfiltered} | Displays the content of the event without going throughthe the_content filter. |
Event Excerpt | {excerpt} | Displays an excerpt of the event content. |
Thumbnail (a.k.a. Featured Image) | {thumbnail} | |
Start Date | {start_date} | Dates display in the format you specify in your date settings for events. |
Start Time | {start_time} | Times display in the time format you specify in your general WordPress settings. |
End Date | {end_date} | Dates display in the format you specify in your date settings for events. |
End Time | {start_time} | Times display in the time format you specify in your general WordPress settings. |
Event Website | {event_website} | The event website will display as a link. |
Event Cost | {cost} | The cost will display as a number without formatting |
Event Cost (Formatted) | {cost:formatted} | The cost will display with the cost formatting settings you’ve specified in your events settings. |
Venues
Field | Variable | Notes |
|---|---|---|
Venue Name | {venue:name} | |
Venue Name (Linked) | {venue:linked} | Displays the venue name as link to the single-venue page. |
Venue Address | {venue_address} | |
Venue Phone | {venue_phone} | |
Venue Website | {venue_website} |
Organizers
Field | Variable | Notes |
|---|---|---|
Organizer Name | {organizer:name} | |
Organizer Name (Linked) | {organizer:linked} | Displays the venue name as link to the single-venue page. |
Organizer Phone | {organizer_phone} | |
Organizer Email | {organizer_email} | |
Organizer Website | {organizer_website} |
⚠️Please Note: Events support having multiple organizers. With this in mind, the above variables for organizers as written will get the data for the first organizer attached to an event.
If you have two organizers, for example, and wanted to display data related to the second organizer, you would just add 2 right before the closing } bracket for any variable.
So you could use {organizer:linked} to show the linked name of the first organizer, {organizer:linked2} to show the linked name of the second organizer, {organizer:linked85} to show the linked name of the eighty-fifth organizer, and so on. This applies to all organizer-related variables listed above in exactly the same way.
Additional Fields
Was this article helpful?
That’s Great!
Thank you for your feedback
Sorry! We couldn't be helpful
Thank you for your feedback
Feedback sent
We appreciate your effort and will try to fix the article