Microsoft OneDrive is a popular cloud storage among users of Microsoft software products. Despite the high level of reliability of its cloud services proclaimed by Microsoft, files can still get lost on OneDrive. Microsoft doesn’t provide special backup tools for OneDrive and is not responsible for data loss on OneDrive according to the terms of use. Therefore, it’s up to you to protect your OneDrive files and perform OneDrive backup.
This blog post can help you answer these questions about OneDrive backup:
The effective method for protecting against ransomware is creating a backup. Read how to create a portable backup appliance with Raspberry Pi and how to back up your data. You can back up the entire physical machine running Windows Server or Windows 10 by using NAKIVO Backup & Replication. Download the free trial version and try to back up your Windows machine on which OneDrive Sync client is configured. If you use Microsoft 365, read more about Microsoft Office 365 Backup.
Why Perform OneDrive Backup
Usually users perform a backup to OneDrive and many users know how to back up to OneDrive in Windows 10. In this article we look at backup the other way: How to back up OneDrive to a local hard disk drive (HDD).
The reasons to back up OneDrive files are:
How to Back Up OneDrive
There are two native methods to back up OneDrive files and folders:
These two methods are explained in detail below.
NAKIVO Backup & Replication delivers high-end data protection for SMBs and enterprises with multiple backup, replication and recovery features, including VMware Backup, Hyper-V Backup, Office 365 Backup and more.
Using the web interface
With this method, you don’t need to configure any software or use any tools other than a web browser.
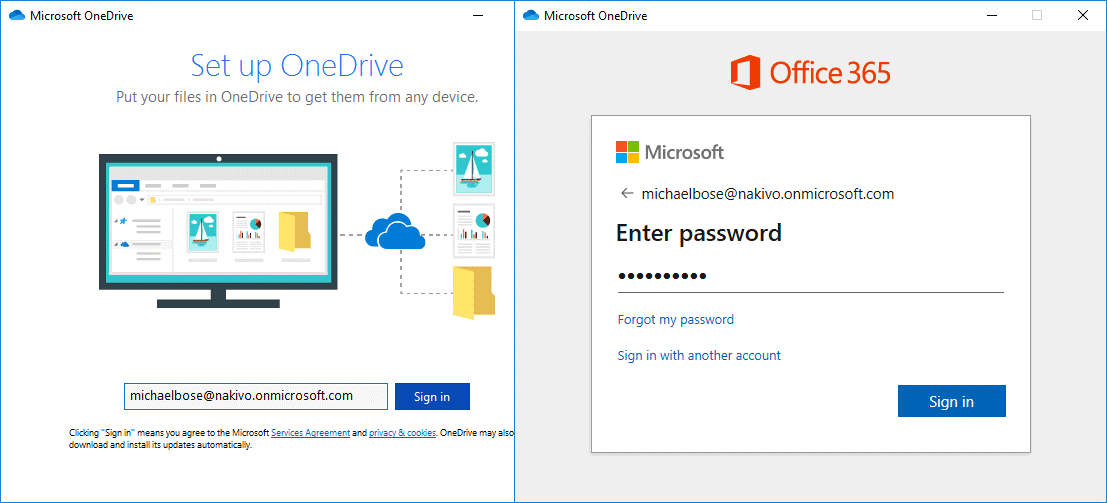
Open a web browser, go to https://products.office.com/en-us/onedrive/online-cloud-storage or https://onedrive.live.com/ and click Sign in.
Enter your login for your Microsoft personal, work or education account. In this example, we log into OneDrive as michaelbose@nakivo.onmicrosoft.com. Hit Next to continue.
Enter your password and hit Sign in.
If you are using two-factor authentication, you need to enter an additional confirmation code to authenticate and use OneDrive.
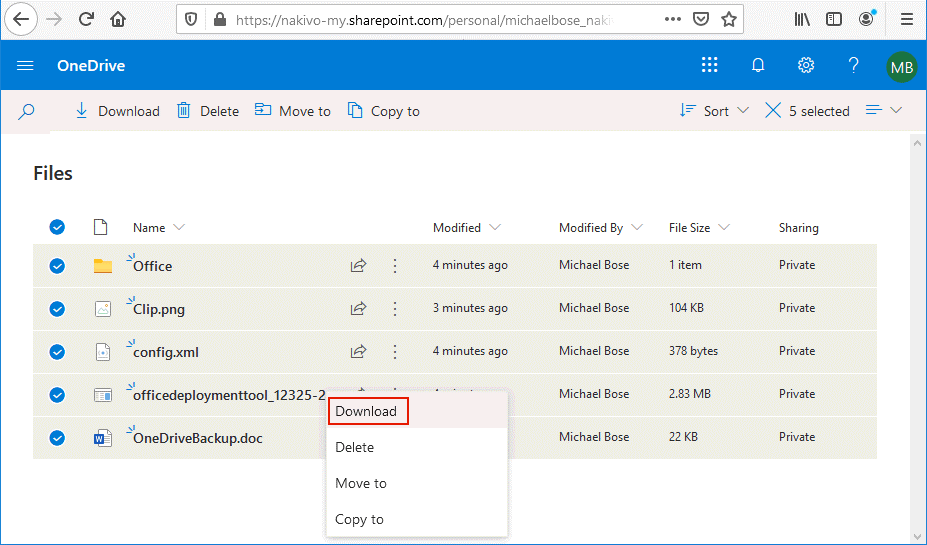
Once you sign into OneDrive via the web interface, you can see your files in the browser. In order to back up OneDrive files manually by using the web interface, select the needed files, right click the selected files and click Download in the context menu or in the upper panel with action buttons.
Select a disk and directory to save the zip archive that contains the OneDrive files you have selected to back up. In this example, the OneDrive backup archive is saved to C:\backup\ directory (this is only an example and it’s recommended that you use a disk drive other than C:\). If you want to store the OneDrive backup archive on an external USB disk drive, select the appropriate directory on the USB disk drive.
Note: Your web browser must be configured to ask you where to save files before downloading. Some browsers are configured to use the Downloads directory by default; in that case you will need to copy files to the required location manually after downloading them. The maximum size of a downloaded zip archive is 20 GB and the maximum size of an included individual file is 10 GB. A downloaded zip archive can contain a maximum of 10,000 OneDrive files.

Using OneDrive Sync
OneDrive Sync Client is a built-in Windows application that is available in the latest Windows versions, with a version for macOS. The app allows you to mount OneDrive on a directory of your Windows file system. It also allows you to download files from OneDrive, upload files to OneDrive and synchronize files between OneDrive cloud environment and your local directory on your Windows machine. You should have enough free space on your hard disk drive to be able to store synchronized files of any volume.
Click the Start button and in the main menu, select OneDrive.

If you are running OneDrive sync client for the first time, you have to enter the credentials of your Microsoft account (username and password).
Set the OneDrive folder on your Windows machine. In this example, we are using “C:\OneDrive - Nakivo” to mount OneDrive. Hit Next to continue.
Sync your OneDrive files to this PC. Select the checkbox: Sync all files and folders in OneDrive. You can select only custom folders that are important and must be synchronized and backed up.

After the initial setup of OneDrive sync app, you can edit settings by clicking the cloud icon in the taskbar near the clock. In the OneDrive menu that opens, click More and in the context menu hit Settings.

Modify the settings if needed and make sure that the settings are correct.

Check whether OneDrive synchronization is working properly. You can create a new text file in Windows Explorer and this file should be displayed soon in the web interface of OneDrive for your account. Changes in the created file are also reflected if everything is working properly.

Creating the OneDrive backup script
After configuring OneDrive sync app to synchronize OneDrive cloud storage with your local Windows folder, you can go on to back up OneDrive files. Note that using only a synchronized OneDrive folder on your local machine is not the same as performing a OneDrive backup.
First, check the date format. Note that if you use the American date format such as MM/dd/yyyy, you will not be able to create a directory with the mkdir c:\backup\%date% command because you cannot use / (slash) as it is a special character for naming files. You can change the short date format in Date and Time settings. Click your clock in Windows Taskbar to open Date and Time settings. In the Date & time section click Change date and time formats. Change the short date format to dd-MMM-yy or another format that doesn’t contain special characters like /.

Create a CMD file. We are creating OneDriveBackup.cmd in C:\files\ in this example. This CMD file contains two actions – creating a directory on a target disk and copying files from OneDrive (a Windows directory to which OneDrive is mounted and synchronized) to the selected directory. The two lines of the CMD file are:
mkdir c:\backup\%date%
xcopy "C:\OneDrive - Nakivo\*.*" C:\backup\%date% /E
Where:
/E must be set to copy all subdirectories in the selected directory (even if they are empty);
%date% is the environment variable that contains the value of the current date;
xcopy is a built-in Windows command line command that is used to copy files similarly to copy, but has additional functionality;
“C:\OneDrive - Nakivo\*.*” – all files in this directory are selected to copy as source files;
C:\backup\%date% – a destination directory to which the selected source files must be copied.
This script is used for the dd-MMM-yy short date format. When using this format, the expressions in the script are simple. The disadvantage is that subfolders created to store OneDrive backups are not sorted by name and date in this case.
There is an alternative method that allows you to keep the MM/dd/yyyy time format but requires modifying commands in the script.
Let’s see how the date values are displayed in the command line with the following example.
Let’s use March 31, 2020, for our example. The date can be checked in the console (CMD) with the command:
echo %date%
03/31/2020
We can use the command line to display only the current month, day or year by modifying the expression of the %date% variable:
echo %date:~0,2%
03
echo %date:~3,2%
31
echo %date:~6,4%
2020
We can use the needed combination of expressions divided by the “-” character to get the date in the required format:
echo %date:~6,4%-%date:~0,2%-%date:~3,2%
2020-03-31

Now you know how to name files and folders with the current date in the required format.
The modified OneDrive backup script (C:\files\OneDriveBackup.cmd) consists of the two lines:
mkdir C:\backup\%date:~6,4%-%date:~0,2%-%date:~3,2%
xcopy "C:\OneDrive - Nakivo\*.*" C:\backup\%date:~6,4%-%date:~0,2%-%date:~3,2% /E
Note: Enter the disk letter of your USB HDD to back up OneDrive files to USB HDD, for example, H:\ and the directory name would be H:\backup\%date:~6,4%-%date:~0,2%-%date:~3,2% /E in this case. You can also select to back up only custom OneDrive subdirectories, such as subdirectories with the frequently edited files (for example, "C:\OneDrive - Nakivo\Doc\*.*").
We are going to use the modified (second) version of the script (with the MM/dd/yyyy short date format in the operating system) to be able to sort backup directories by name and date.
Run the script:
C:\files\OneDriveBackup.cmd
The target directory is now created and files are copied from OneDrive to the backup directory and the backup subdirectory for the specified date. The OneDrive backup for March 31 is stored in C:\backup\2020-03-31\ in this example. Note that we are using disk C: for demonstration purposes only and it is recommended that you use other partitions or disks to store OneDrive backups.

Always keep in mind the 3-2-1 backup rule. If you have performed a OneDrive backup to a local disk on your computer, create a backup copy to an external hard disk drive or another storage medium. It is recommended to disconnect an external disk from a computer after copying OneDrive backup to that disk to avoid corruption of a backup if a computer gets infected by ransomware.
OneDrive backup automation
Running the CMD script manually allows you to create OneDrive backups on demand. However, you can do more to automate the OneDrive backup process. You can use Windows scheduler and schedule running the backup CMD script.
Go to Start and open Task scheduler in your Windows, or press Win+R and run taskschd.msc to open the window of scheduler. In the Task Scheduler window click Action > Create task.

The Create Task window contains five tabs. In the General tab, enter the task name, for example, OneDrive Backup, and enter the description (optional). In security options, select a user to run the task and set the other options.

Triggers. In this tab click New. In the New Trigger window, schedule the start time for the task and select the scheduling settings – run the task daily starting from today at 3:15 AM and recur every 1 day. Select the Enabled checkbox. Hit OK to save settings.

Actions. Click the New button in this tab. In the New Action window select options:
Action: Start a program
Program/script: C:\files\OneDriveBackup.cmd (click Browse and select your CMD script)

Conditions. In this tab, you can set the needed conditions options, for example:

Settings. This tab allows you to configure settings for the scheduled task. You can set the options:
Hit OK to save the settings and create the OneDrive Backup task in Windows Task Scheduler.

Now your OneDrive Backup task is scheduled to run automatically once a day at 3:15 AM. This task is displayed in the Task Scheduler Library. Now you can close the Task Scheduler window.

OneDrive Recovery
Let’s manually delete some files on OneDrive to explore the recovery workflow for lost files.
There are two approaches in recovering lost OneDrive files:
In the first case, you must have a physical disk on which you backed up your files from OneDrive. Access your OneDrive backup directory and manually copy the needed files to OneDrive via the web interface or by using the OneDrive directory mounted to your Windows machine. OneDrive in the cloud will be synchronized quickly with the OneDrive directory in Windows. If you are working with OneDrive remotely and don’t have your computer and your disk at the same location as the backup, consider using the second method and try to recover OneDrive files by using options provided by the web interface of Microsoft OneDrive.
There are two main places in the web interface that can be used for OneDrive recovery:
- Recycle bin
- Restore your OneDrive
These options are marked as “1” and “2” respectively on the screenshot below.

OneDrive recovery by using the Recycle bin
Open the web interface of OneDrive for your account.
Click the three-line menu ≡ in the top left corner of the OneDrive web page and select Recycle bin (marked as “1” on the screenshot above). Select the files you need in the Recycle bin and click Restore to start OneDrive recovery.
Keep in mind that deleted files are stored in the Recycle bin for 30 days only from the date of deletion. After the 30-day period has lapsed, you can still try to recover deleted files from the Second-stage recycle bin by using the link at the bottom of the OneDrive Recycle bin web page. However, the files can get deleted from the Second-stage recycle bin as well: manually (by Office 365 users) or automatically (in case there is not enough disk space).
If files are deleted within 30 days after placement in the Second-stage recycle bin, Office 365 users can try to recover OneDrive files with Restore your OneDrive options (2). Office 365 users can restore deleted files for three months (90+3 days) from the time when the files were first deleted. Other users have a maximum of 60 days to restore deleted OneDrive files (by using the Recycle bin and the Second-stage Recycle bin). If the size of the files in the Recycle bin exceeds 10% of your total OneDrive storage, the files that were sent to the Recycle bin first will be deleted earlier (before the 30-day period expires but not earlier than 3 days after sending the deleted files to the Recycle bin).

When you are in the Second-stage recycle bin, select the needed files and click Recover as described for file recovery from the Recycle bin.
Using Restore OneDrive options
Restore your OneDrive is an alternative recovery option for files deleted from OneDrive.
Click the Settings icon in the right top corner of the OneDrive homepage and in the menu that opens click Restore your OneDrive (marked as “2” on the screenshot above).
On the Restore your OneDrive page, select a date that represents the needed state of the files you are going to recover. If a file was not deleted but undesired changes were applied to the file and some important data was partially deleted from the file, you can also use Restore your OneDrive options. On the image below you can see charts that display OneDrive disk usage activity. Use the charts to identify the day with the abnormal activity when your files could have been deleted or corrupted.

Scroll down the page and select the files to recover. File changes on OneDrive are listed in chronological order. Let’s select Yesterday as the needed date in the drop-down menu, then select the needed files and click Restore.

Now the selected files are restored to the original location in the state for the selected date and time.
Conclusion
This blog post covers how to back up OneDrive by using the OneDrive free native functionality. You can use OneDrive sync client to copy OneDrive files to a folder on your Windows machine and synchronize OneDrive Cloud storage with the folder on your local hard disk. However, having OneDrive files in the synchronized folder is not the OneDrive backup. Files in the synchronized folder can be corrupted if your Windows machine is infected by ransomware or malware. That’s why you should copy the needed files from the mounted and synchronized OneDrive folder to a safe location. Creating a CMD script can help you automate the process. A good practice is to back up OneDrive files to an external hard drive and disconnect that hard drive after a backup process is completed. If you don’t have a OneDrive backup, you can use built-in recovery options in the web interface of OneDrive for your account, such as recovery from the Recycle bin and Restore your OneDrive options.
Was this article helpful?
That’s Great!
Thank you for your feedback
Sorry! We couldn't be helpful
Thank you for your feedback
Feedback sent
We appreciate your effort and will try to fix the article